What is VIC:
VIC - vSphere Integrated Containers enable IT, teams, to seamlessly run traditional workloads and container workloads side-by-side on existing vSphere infrastructure.
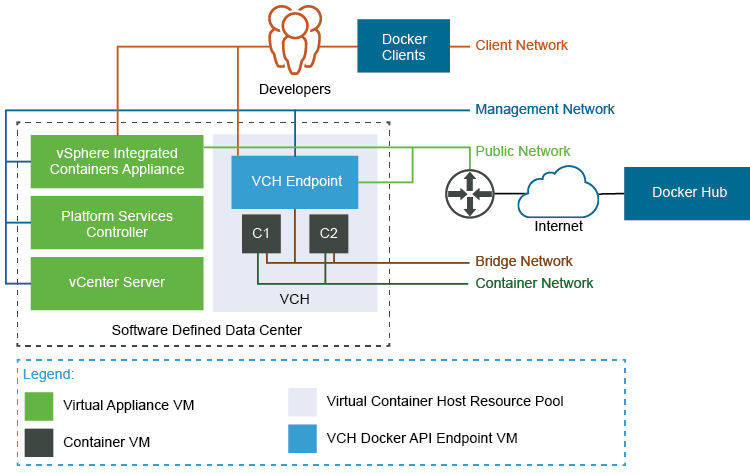
The solution is delivered in the form of an appliance just like any other VMware mgmt solution. The appliance comprises of,
- vSphere Integrated Containers Engine, a container runtime for vSphere that allows you to provision containers as virtual machines, offering the same security and functionality of virtual machines in VMware ESXi™ hosts or vCenter Server® instances.
- vSphere Integrated Containers Plug-In for vSphere Client, that provides information about your vSphere Integrated Containers set up and allows you to deploy virtual container hosts directly from the vSphere Client.
- vSphere Integrated Containers Registry (Harbor), an enterprise-class container registry server that stores and distributes container images. vSphere Integrated Containers Registry extends the Docker Distribution open source project by adding the functionalities that an enterprise requires, such as security, identity, and management.
- vSphere Integrated Containers Management Portal, a container management portal, built on the VMware Admiral project, that provides a UI for DevOps teams to provision and manage containers, including the ability to obtain statistics and information about container instances. Management Portal administrators can manage container hosts and apply governance to their usage, including capacity quotas and approval workflows. Management Portal administrators can create projects, and assign users and resources such as registries and virtual container hosts to those projects.
All components run on Photon OS 2.0. These components currently support the Docker image format. vSphere Integrated Containers is entirely Open Source and free to use.
Why VIC and how does it differ from other services:
As the VIC is entirely Open source and freeware, it can be tested in any existing VMware environment. We do not need many efforts or changes to introduce VIC in our setup.
With no or minimal efforts we can get the VIC up and running. The VIC can be used for any container/cloud-native application testing. If you are a starter or new to cloud-native application hosting/testing then VIC is a great place to start.
Being said if you are a learner or new to container apps, then VIC will become handy, as you don't need to spend much time on setting up the foundation.
Unlike any other cloud-native platforms, VIC doesn't require much time to set up the base infrastructure. Once you deploy the VIC, you are ready to spin up the 1st container.,
Deployment of VIC:
The deployment of VIC appliance is as same as any other vmware appliance and pretty straight forward.
Read more : https://vmware.github.io/vic-product/assets/files/html/1.5/vic_vsphere_admin/vi_reqs.html
Important note regarding Network:
Configuration steps :
Once we deploy the appliance successfully the next is to configure it for use.
1. Open Chrome and access the appliance to get the administration portal.

2. This is the landing page of the VIC

3. Next step is to configure the users who can manage the VIC and VCH. This can be done in Identity management.

4. Create a new Project. The project can be either allocated to a team or for a specific application hosting. This is a logical grouping of containers

5. There will be a default project as well and we can add the projects based on the necessity

6. Each project should have a members or entitlements, internal repositories settings, Infrastructure ( where we add the VCH) etc

7. We can add the users from the Identity manager ( integrated with LDAP or AD). Assign the role of the user in the specific project

8. We can add users and groups for multiple projects at once

9.

Next topic we cover :
1. How to deploy a VCH
2. Add VCH host to the Project
3. Spin up the first container in the project
Thanks for reading!