Customers who uses NSX day-in, day-out would like to have a point-in time restore functionality of DFW firewall rules. Many customer have a large footprints in VMC and make changes to DFW quite often.
This feature was missing for long time and we could see its included in recent versions . Let's see how DFW configuration roll back works
NSX DFW configuration has versioning, and it is stored in the NSX Manager. Every time when someone update DFW configuration, NSX creates one more version but keep storing the previous ones. You can rollback for previous config but reapplying it once again.

In my existing test setup, with the current setting everything works well. The test vms are able to ping each other.


In the screen we see a dot with and when we place the cursor on the dot we get to see when the last rule update was done. Look at the time of the change and click on the rule Name


Now we see a new rule Change-2 as well as the Change-1. Let's review the configuration changes snapshot under Actions, > View.


Other Options :


This feature was missing for long time and we could see its included in recent versions . Let's see how DFW configuration roll back works
NSX DFW configuration has versioning, and it is stored in the NSX Manager. Every time when someone update DFW configuration, NSX creates one more version but keep storing the previous ones. You can rollback for previous config but reapplying it once again.
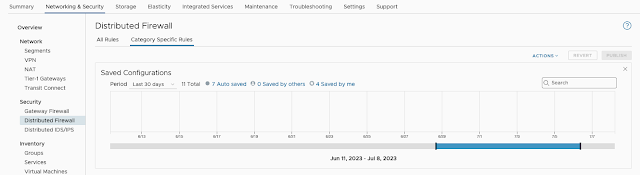
You can find the options under Networking & Security tab, > Security > Distributed Firewall. In the right side we see an Actions drop down. Choose View to get to the below screen.
Let’s go through the use case:
- 1. Original state- default config with no custom rules:
- a. There are no saved configurations during last 30 days:

In my existing test setup, with the current setting everything works well. The test vms are able to ping each other.

- 2. New configuration : Let's go ahead and create new rules
- 1. Create a new rule to reject the traffic from VM 172.16.30.11.

As we see in the screenshot the traffic from the VM is now rejected . Let's try to ping test and confirm the same.

Let's go to Actions and View the saved configurations.
In the screen we see a dot with and when we place the cursor on the dot we get to see when the last rule update was done. Look at the time of the change and click on the rule Name

When we open the last draft , a new window appears with more details. As we see the last change was done by the user " userid" and also the time stamps.

Expand the lower section under Draft changes to check the rule details :

The rule what we added shows up here.
Let's create another policy and a rule for a demo purpose.
Let's create another policy and a rule for a demo purpose.


Let say the changes we made is wrong and impacting the pings. And we decide to roll back to the previous state.
A. Go to Actions and under View choose the state we need to go back to. In our case its the first dot ( confirm the time lines as well).

Here we should see 2 Firewall config and 2 Policy ( 1 we added to reject and another one to demo) . Both the policies and rules will be deleted - 4 in total ( going to exact previous state - before state).
Push “Load” and revert configuration to the last known-good state before these changes: When below screen appears , click on Load

In the next screen we could see the state as exactly as previous one. We need to publish them to make it effect. ( click publish)

Now check the connectivity of the VMs are restored to the original state.

Other Options :
Under Actions > click on Save >
This option helps to store the state of the DFW firewall. We can use this option before making any major changes ( like before change management window). This helps to restore to the previous state if the Change fails.

And we could see a dot with Star - highlight helps to fetch the details without opening multiple dots.

FAQ: Service disruptions:
Rollback of NSX rules is the same process as applying new (or change) DFW rules. I.e., underneath, each ESXi host will get a new list of rules, which corresponds to the ones at the time we are doing the roll back.
This will lead to the fact that if some other rules (let's call them, useful and valid) were created from the point we want to go back to, they too will be revoked. And consequently, the traffic that was going through them will stop going through right after the rollback. For this reason, before doing a rollback, it is worth looking at all the changes that have happened since then and fixing (cloning/exporting) the "useful" rules. And add them again after you do the rollback.